
This lesson is made with PSPX9
But is good with other versions.
© by SvC-Design
Materialen Download :
Here
******************************************************************
Materials:
alfa.pspimage
feather-Ri@.png
fotolijst peacock Ri@.PspFrame
kleuren251.jpg
NarahsMasks_1697.jpg
NarahsMasks_1717.jpg
peacock.jpg
tekst-White Peacock-Ri@.png
******************************************************************
Plugin:
Effects – plugin - Graphic Plus - Cross Shadow
Effects - Plugins - Mehdi - Sorting tiles
Effects - Plugins - Mehdi - Eraser genuine
Effects – plugin - phpshares hdj2 - Michelle
Effects - Plugins - Deformation - Bulging edge average
Effects - Plugins - Mura's Meister - Perspective Tiling
Effects – plugin - Alien Skin - Eye Candy 5 - Textures - Weave
******************************************************************
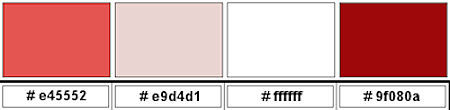
color palette
:
******************************************************************
methode
When using other tubes and colors, the mixing mode and / or layer coverage may differ
******************************************************************
General Preparations:
First install your filters for your PSP!
Masks: Save to your mask folder in PSP, unless noted otherwise
Texture & Pattern: Save to your Texture Folder in PSP
Selections: Save to your folder Selections in PSP
Open your tubes in PSP
******************************************************************
We will start - Have fun!
Remember to save your work on a regular basis
******************************************************************
1.
Foreground color # e45552
Gradient - Linear - Angle 45 - repeats 0 - invert checkmark
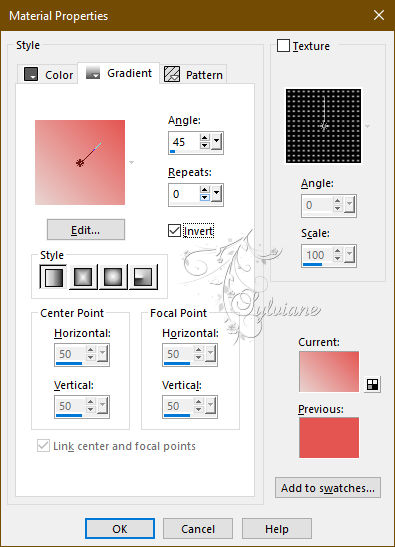
Background color # e9d4d1
Extra colors # ffffff and # 9f080a
2.
Open the alpha sheet in PSP.
Window - duplicate.
Close the original.
We are working on the duplicate
Selections - select all.
3.
Open peacock.jpg
Edit - copy.
Back to your image.
Edit - paste into selection.
Selection - Select None
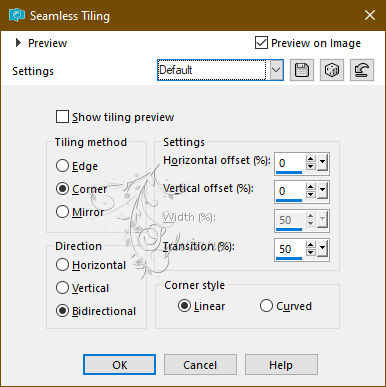
4.
Effects - Image Effects - Seamless Tiling - default.
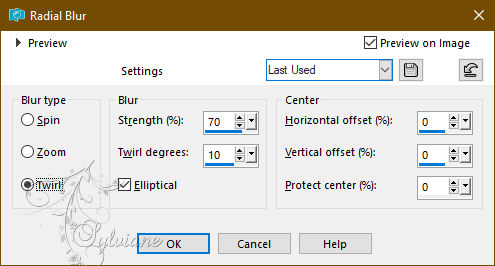
5.
Adjust - blur - radial blur.
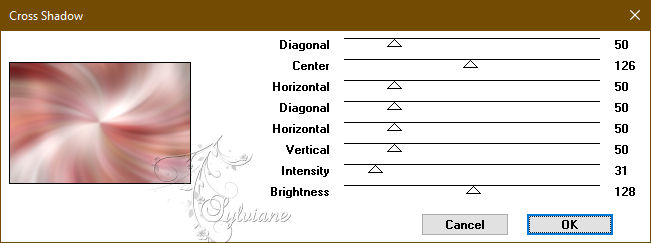
6.
Adjust - blur - gaussian blur
Range: 5.
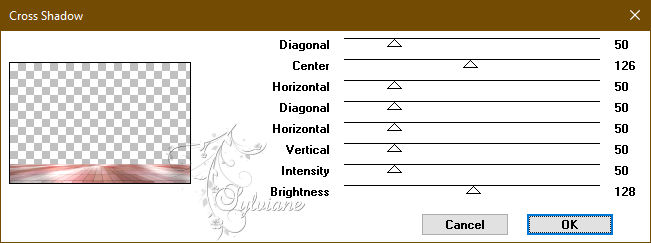
Effects – plugin - Graphic Plus - Cross Shadow
7.
Layers - new raster layer.
Fill the layer with the gradient.
Effects - Plugins - Graphic Plus - Cross Shadow - still same
8.
Effects - Plugins - Mehdi - Sorting tiles.
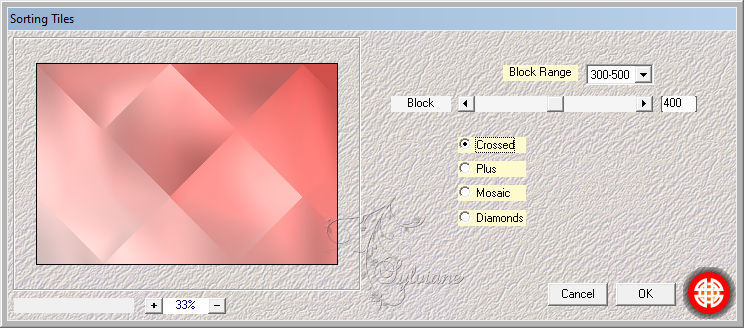
9.
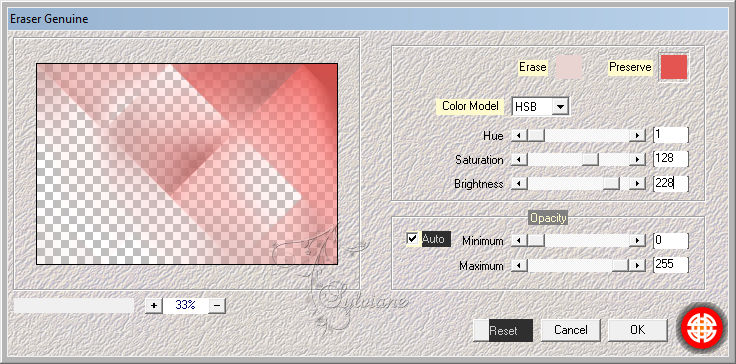
Effects - Plugins - Mehdi - Eraser genuine - default.
10.
Effects - Edge Effects - Enhance
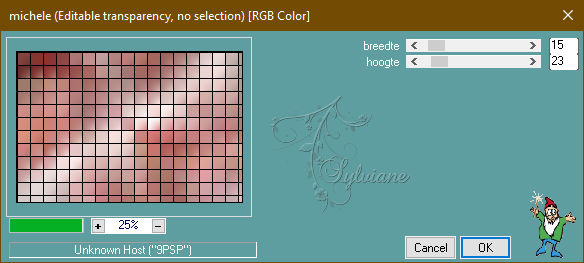
Effects – plugin - phpshares hdj2 - Michelle - default.
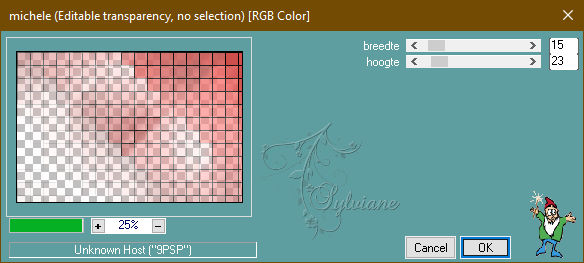
Layer opacity 65.
11.
Layers - new raster layer.
Fill the layer with the foreground colour.
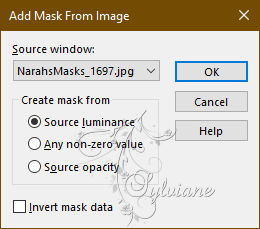
Layers - New Mask Layer - From Image - NarahsMasks_1717.jpg - do not invert.

Layers - merge - merge group.
Effects - Edge Effects - Enhance More
Effects - 3D Effects - drop shadow.
2/2/35/2 - extra colour # 9f080a
12.
Activate the bottom layer.
Layers - duplicate.
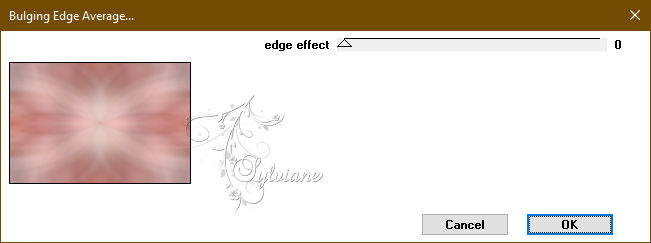
Effects - Plugins - Deformation - Bulging edge average.
13.
Activate the top layer.
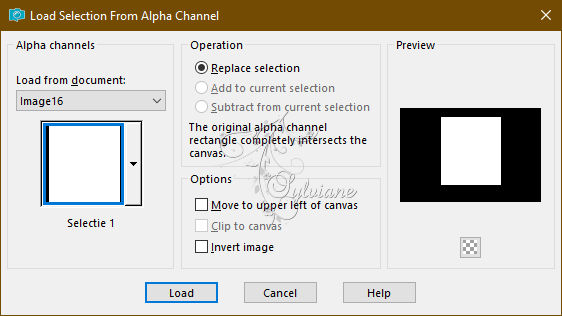
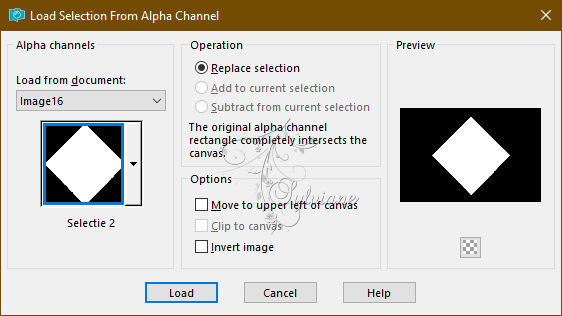
Selections - load/save selection - load selection from alpha channel - open selection 1.
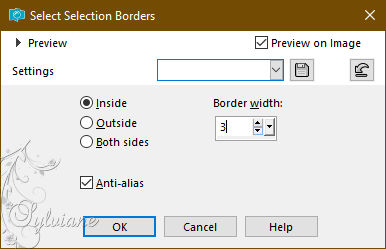
Selections - modify - select selection borders
Layers - new raster layer.
Fill the selection with the foreground colour.
Selection - Select None
14.
Click with the magic wand in the frame.
Selections - modify - expand - 1 pixel.
Open the image peacock again.
Edit - copy.
Back to your image.
Layers - new raster layer.
Edit - paste into selection.
Selection - Select None
Layers - arrange - move down.
15.
Activate the top layer.
Layers - merge - merge down.
Effects - 3D Effects - drop shadow.
0/0/35/20 - color black.
16.
Layers - new raster layer.
Selections - load/save selection - load selection from alpha channel - open selection 2.
Flood fill the selection with the foreground colour.
Selections - modify - contract - 4 pixels.
Click on the delete button on your keyboard.
Selection - Select None
Image - resize - 75% - all layers unchecked.
Effects - Image Effects - Seamless Tiling - default.
17.
Selections - load/save selection - load selection from alpha channel - open selection 2 again.
Click the delete button on your keyboard.
Selection - Select None
Layers - arrange - move down.
18.
Activate the top layer.
Layers - new raster layer.
Fill the layer with the colour white.
Layers - New Mask Layer - From Image –
Narah_Mask_1697 - do not invert.
Layers - merge - merge group.
Effects - Texture Effects – wave
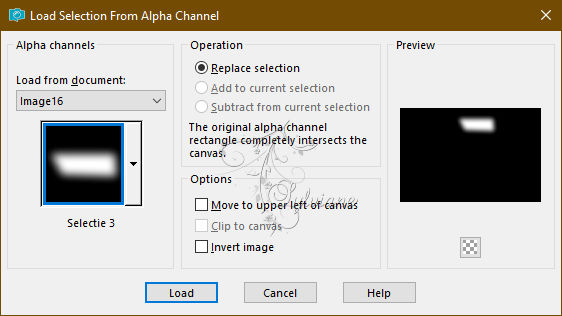
Selections - load/save selection - load selection from alpha channel - selection 3.
Click the delete button on your keyboard.
Selection - Select None
19.
Activate the bottom layer.
Layers - duplicate.
Layers – arrange – bring to top
Effects - plugin - phpshares hdj2 - Michelle - default – same settings
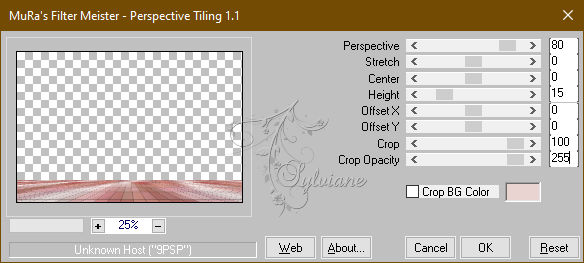
Effects - Plugins - Mura's Meister - Perspective Tiling.
Effects - Plugins - Graphic Plus - Cross Shadow.
Layer opacity 80.
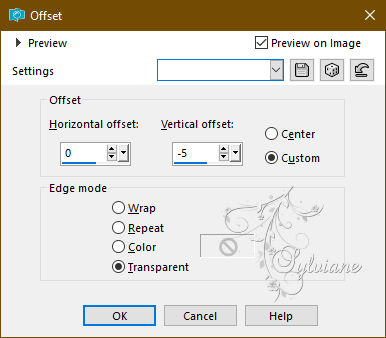
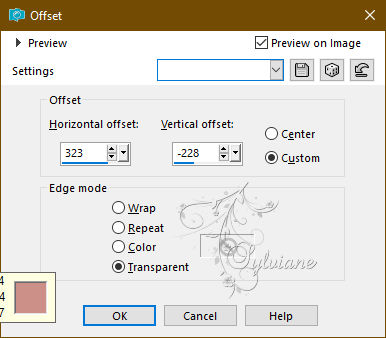
Effects - Image Effects - Offset
20.
Open the image peacock again.
Edit - copy.
Return to your image.
Activate the layer copy of raster 1 (the second bottom layer).
Layers - new raster layer.
Selections - select all.
Edit - paste - into selection.
Selection - Select None
Image - Mirror – mirror Horizontal
Opacity: 15.
21.
Activate the top layer.
Selections - load/save selection - load selection from alpha channel - open selection 4.
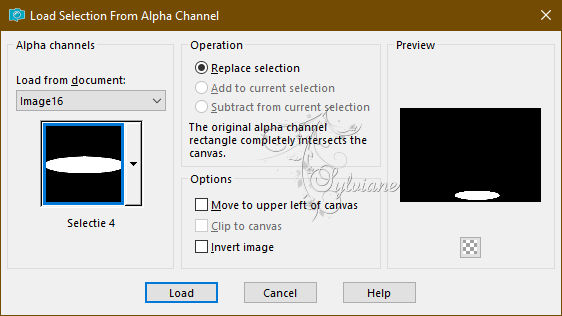
Layers - new raster layer.
Flood fill the selection with colour # 9f080a.
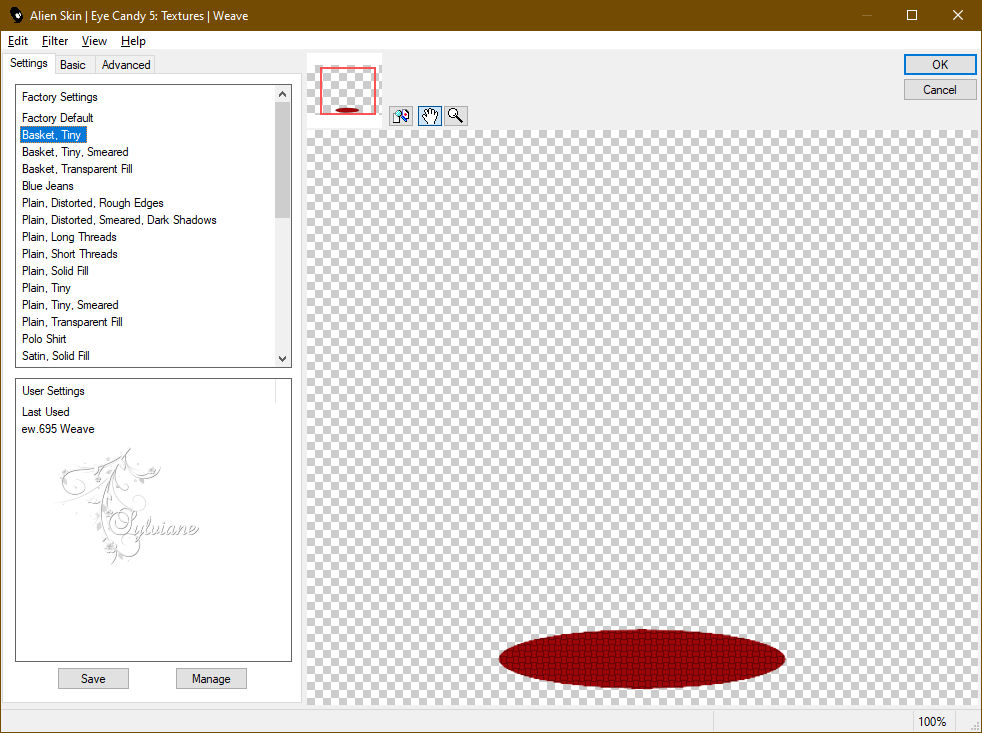
Effects – plugin - Alien Skin - Eye Candy 5 - Textures - Weave -choose Basket, Tiny in settings.
Selection - Select None
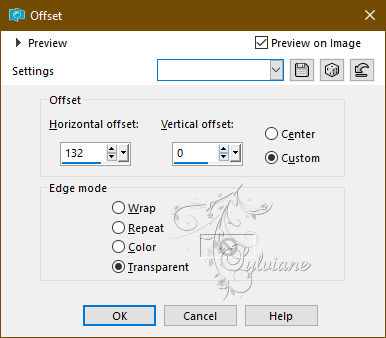
Effects - Image Effects - Offset
22.
Open the tube text-White Peacock-Ri@.
Edit - copy.
Return to your image.
Edit - paste as a new layer.
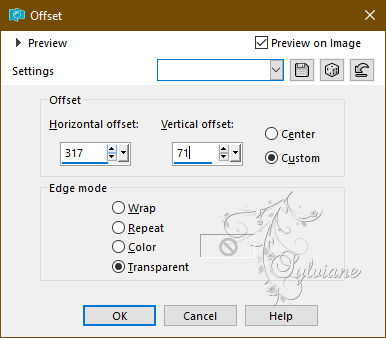
Effects - Image Effects - Offset
23.
Open the tube feather.
Edit - copy.
Back to your image.
Edit - paste as a new layer.
Effects - Image Effects - Offset
24.
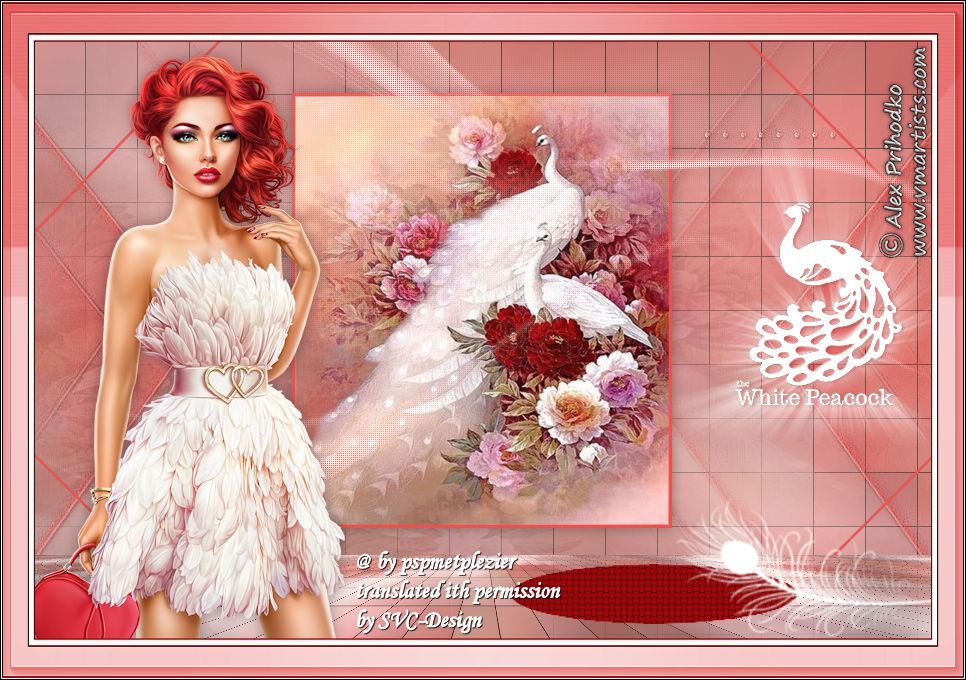
Open your chosen tube.
Move the tube to the left.
And give the tube a nice drop shadow.
Layers - merge - merge all layers.
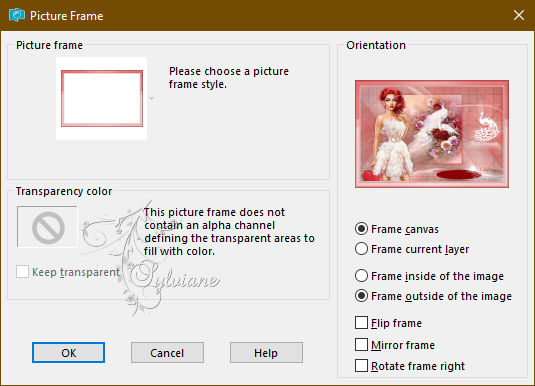
Image - Picture frame.
Image - picture frame - picture frame peacock Ri@.
25.
Place your name or watermark.
Layers - merge - merge all layers.
Image - resize - 600 pixels - longest sides.
Save as JPEG
Back
Copyright Translation 2023 by SvC-Design
------------------------------------------------------------------------------
Thanks to all who created